
Cutting drone video latency from 333 ms to 89 ms on a Raspberry Pi Zero 2 W
How we measured camera-to-screen delay on a Pi Zero 2 W video link, where the time actually went, and the changes that took it from a third of a second to under 90 ms. Most of the gain came from places no tool was watching.
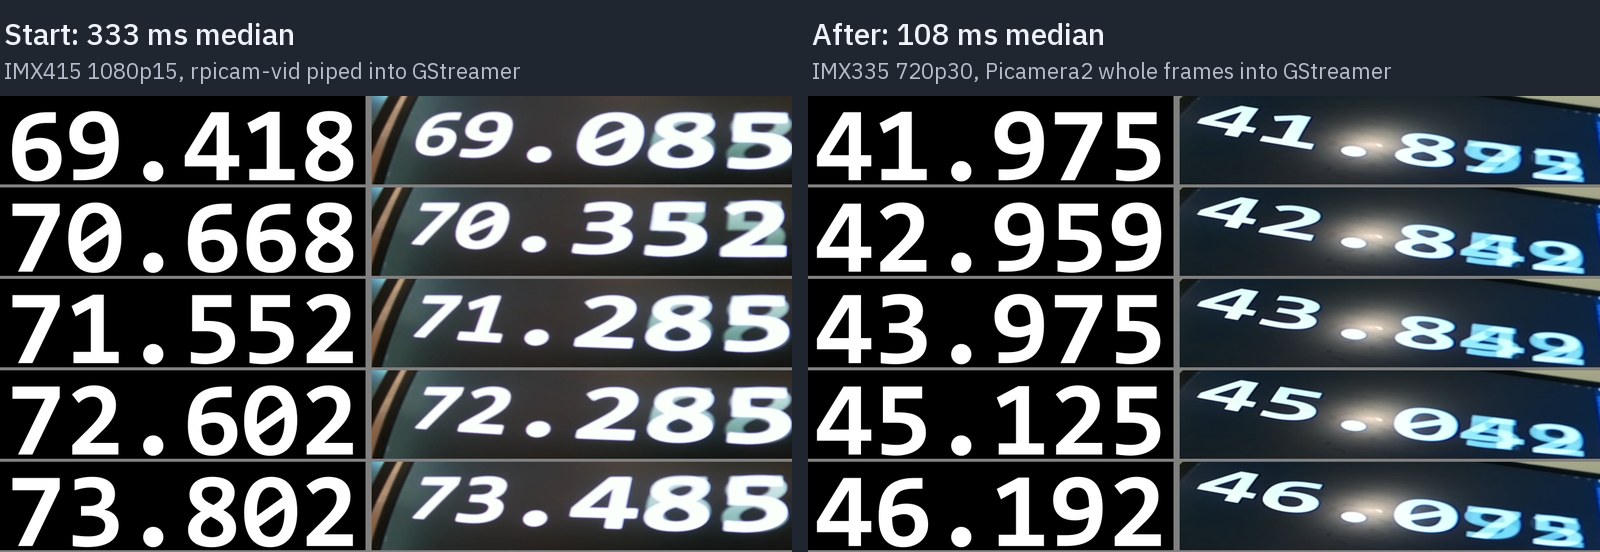
When you fly a drone from its camera, every millisecond between the scene and your screen is time you spend reacting to the past. At 10 m/s, 300 ms of video delay means you see the vehicle 3 m behind where it really is. We wanted a low-latency video link from a Raspberry Pi Zero 2 W, the smallest host the flightHAT supports, to a ground station running QGroundControl.
We started at 333 ms and ended at 89 ms on a Steam Deck. The biggest wins weren’t encoder tuning. They came from a decoder setting on the PC, from picking a sensor mode the Pi could actually keep up with, and from removing a one-frame wait hiding in a pipe.
The setup
| Part | What we used |
|---|---|
| Camera host | Raspberry Pi Zero 2 W (4 × Cortex-A53 at 1 GHz, 512 MB, VideoCore IV ISP and H.264 encoder) |
| Cameras | Sony IMX415 module (8 MP), then a Sony IMX335 module (5 MP, with a 2 × 2 binned mode) |
| Encoding | The Pi’s hardware H.264 encoder, RTP over UDP |
| Links | USB networking to a Windows PC; the Pi’s own Wi-Fi access point to the Steam Deck |
| Ground stations | Windows 11 PC with a 60 Hz monitor; Steam Deck OLED (90 Hz) with a GStreamer viewer and with QGroundControl |
The video path has stages on both sides of the link, and each one can hold a frame:
camera host (Pi):  exposure → sensor readout → ISP → H.264 encode → RTP/UDP
link:              USB or Wi-Fi
ground station:    jitter buffer → decode → compositor → screen
How we measured it
We measured two ways, and needed both.
Glass to glass is the number that matters: light in at the lens, light out of the screen. We put a millisecond clock on the ground station’s screen, pointed the camera at it, and showed the video next to it. One screenshot then holds both the live clock and the clock as the camera saw it some time ago. The difference is the latency.
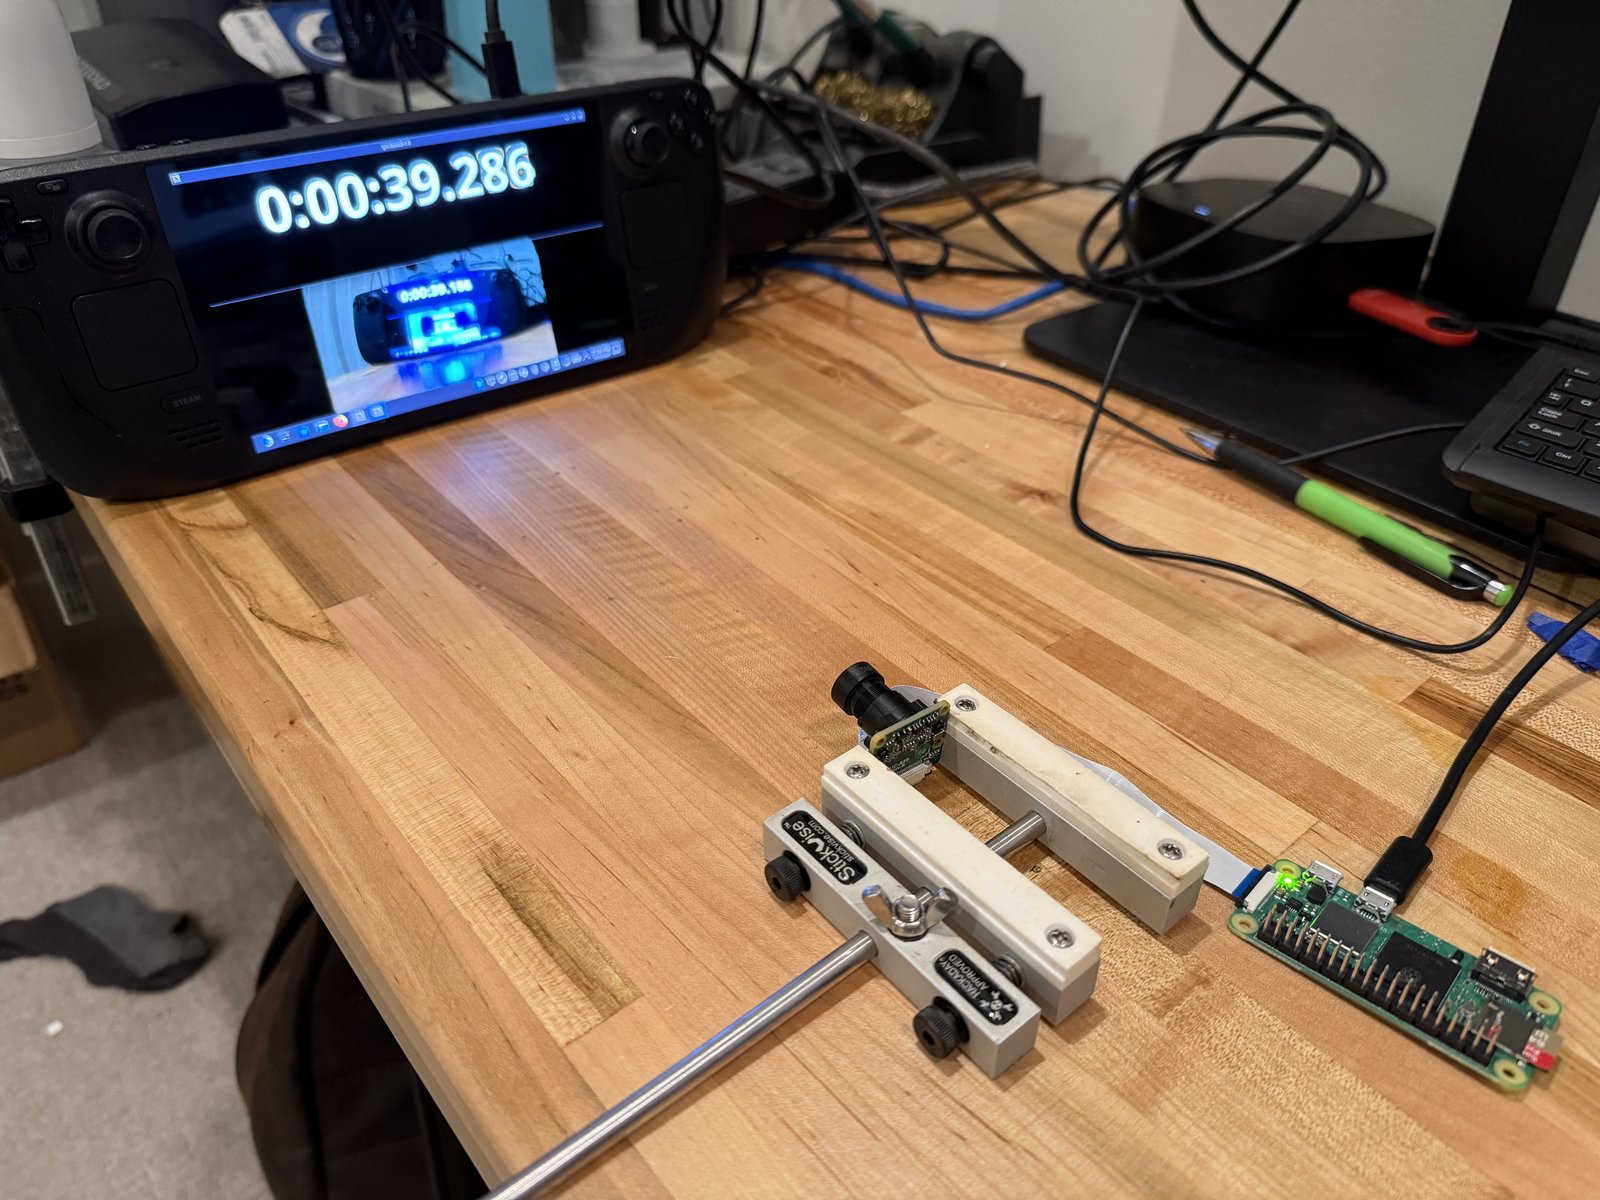
The bench during the Steam Deck tests: the Pi Zero 2 W (right) with its camera held in a vise, streaming over the Pi’s own Wi-Fi to the Deck. The Deck shows the clock at the top and the camera’s video of itself below, so every video frame holds an older copy of the clock. A screenshot on the Deck captures both at the same instant:
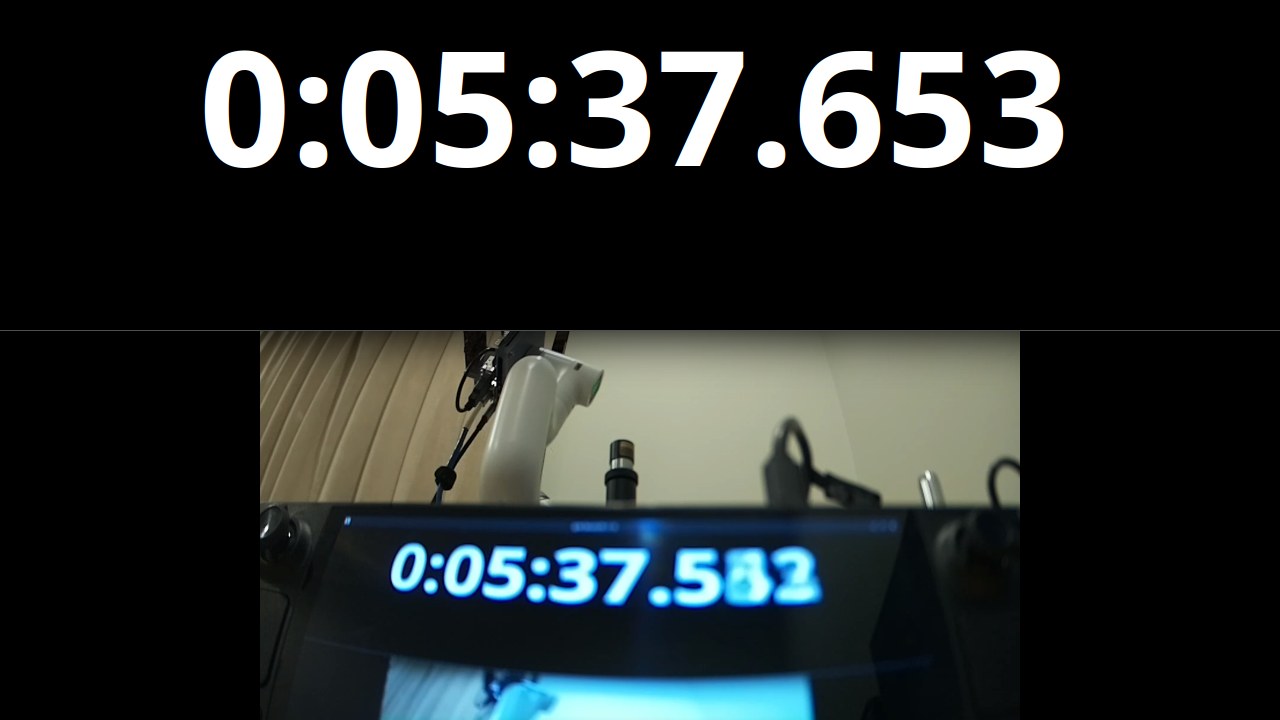
Each reading is only good to one screen refresh (±17 ms at 60 Hz), so we took 20 screenshots per setup and used the median. The hero image above shows five of the twenty from the start and the end of this work.
Per-stage timing tells you where to look. On the Pi we timestamped each frame from the sensor’s own timestamp through the encoder output, all on the same monotonic clock. On the PC we used GStreamer’s latency tracer for the receive side, and ping for the link.
Neither is enough alone. Early on, the stages we could time added up to 140 ms while glass to glass was 283 ms. The missing time was in places no tool watched: a wait inside a pipe, the desktop compositor and the monitor.
The results
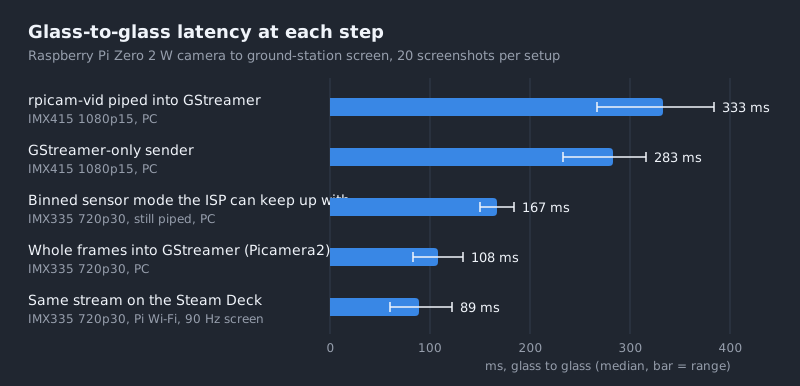
| Step | Camera and mode | Ground station | Glass to glass, median (range) |
|---|---|---|---|
Start: rpicam-vid piped into GStreamer |
IMX415, 1080p15 | PC | 333 ms (267–384) |
| GStreamer-only sender | IMX415, 1080p15 | PC | 283 ms (233–316) |
| Binned sensor mode | IMX335, 720p30 | PC | 167 ms (150–184) |
| Whole frames into GStreamer | IMX335, 720p30 | PC | 108 ms (83–133) |
| Same stream | IMX335, 720p30 | Steam Deck, Wi-Fi | 89 ms (60–122) |
All of these already include the first fix below, on the PC’s decoder.
What made the difference
1. The ground station’s decoder was holding frames (−190 ms)
The first surprise was on the PC. Windows’ hardware H.264 decoders (Direct3D 11, Direct3D 12 and NVIDIA’s) each held two or three frames before showing anything, whatever we set. At 15 fps that was 134–204 ms.
A plain software decoder, FFmpeg’s avdec_h264 limited to one thread, shows each frame as soon as it’s
decoded: about 4 ms for 1080p on a desktop CPU. The single thread matters, because FFmpeg’s frame threading
adds a frame of delay per thread.
| PC decoder | Delay it added |
|---|---|
| Direct3D 11 / 12 or NVDEC hardware decoders | 134–204 ms (2–3 frames held) |
avdec_h264, default threads |
about one frame per thread |
avdec_h264 max-threads=1 |
≈ 4 ms |
H.264’s Baseline profile only helps a decoder that reorders frames. With the software decoder, High profile is just as fast and looks better.
2. Budget the ISP in sensor pixels per second (−165 ms)
The Pi’s image signal processor (ISP) turns the sensor’s raw data into a picture. On the Zero 2 W it managed about 130 megapixels per second at its stock clock. What it has to process is the sensor frame, not the output frame:
The IMX415’s driver only offers its full 3864 × 2192 mode. At 15 fps that’s 127 Mpixel/s, just inside the budget. Asking for 30 fps didn’t give 30 fps. It gave 17 fps and more latency, because frames queued behind the overloaded ISP. Cropping didn’t help either: the ISP’s first stages run over the whole frame before any crop.
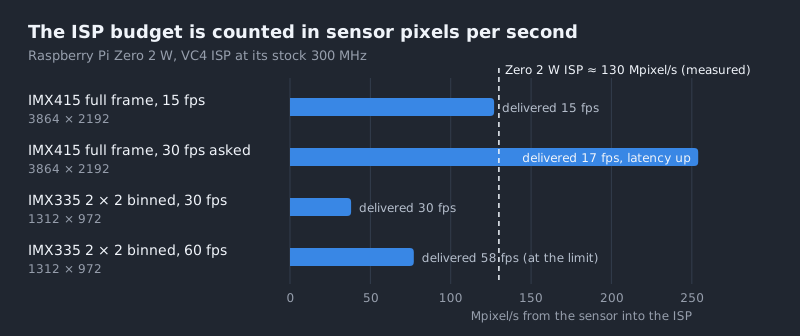
The IMX335 has a 2 × 2 binned mode (1312 × 972) that keeps the full field of view at a quarter of the pixels: 38 Mpixel/s at 30 fps. Readout plus ISP time dropped from 128 ms to 33 ms. Overclocking the ISP wasn’t the answer: 400 MHz took the IMX415 only to about 20 fps and isn’t trustworthy without overvolting.
Using the IMX335 on the Pi needed one extra piece. libcamera needs a small sensor-specific “camera helper” compiled into its image-processing module, and the stock build didn’t include one for this sensor. We cross-compiled it in Docker in about 3 minutes. Building it on the Pi itself took an hour and ran it out of memory.
3. Keep frames whole from the encoder to the network (−59 ms)
The common recipe pipes the encoder’s output into GStreamer:
rpicam-vid -o - | gst-launch-1.0 fdsrc ! h264parse ! rtph264pay ! udpsink ...The pipe turns frames into a plain byte stream, so h264parse can’t tell a frame has ended until the
next one starts. That costs one frame, and the pipe adds buffering of its own. We replaced it with a small
Python sender: Picamera2 drives the camera and the hardware encoder, and each encoded frame goes into
GStreamer as one complete buffer (appsrc), straight to the RTP payloader. That took 167 ms to 108 ms.
4. The rest: faster readout, and things that didn’t matter
- A faster sensor link helps even at the same frame rate. Doubling the IMX415’s CSI link from 360 to 720 MHz cut readout plus ISP from 128 to 91 ms at the same 15 fps.
- The jitter buffer cost nothing. GStreamer’s
rtpjitterbufferonly holds packets that are missing or out of order, so on a clean link 0 ms and 50 ms settings measured the same. We kept 50 ms for Wi-Fi. - The USB link was under 1 ms.
- The Pi’s CPU was 85 % idle at 30 fps. The limits were all in the VideoCore’s ISP and encoder blocks.
Where the 108 ms goes now
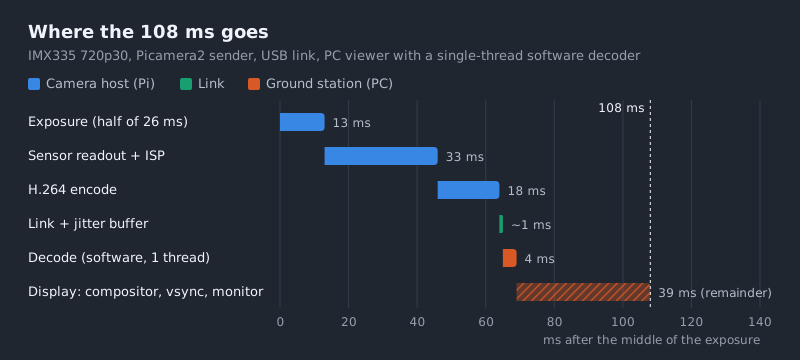
The clock starts at the middle of the exposure, the moment the picture is “taken” on average. The camera host now accounts for about 64 ms, the link almost nothing, and the ground station about 43 ms. Most of that is the last stretch, compositor, vsync and the monitor itself, which we inferred as the remainder rather than timed directly. The Steam Deck’s 90 Hz screen is one reason it measured 89 ms instead of 108.
Above 30 fps, frame rate stopped mattering
Most latency is counted in frames: readout, ISP, encode and every queue each cost about one frame period. So we expected 60 fps to roughly halve it. It didn’t.
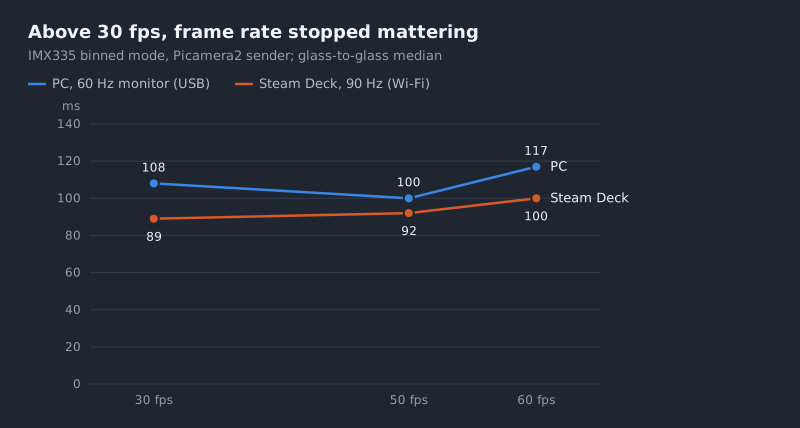
| Frame rate | PC, 60 Hz monitor | Steam Deck, 90 Hz |
|---|---|---|
| 30 fps | 108 ms | 89 ms |
| 50 fps | 100 ms | 92 ms |
| 60 fps | 117 ms | 100 ms |
The IMX335’s binned mode always reads out at its 60 fps speed (a lower frame rate just waits longer between frames), and the ISP and encoder take the same time per frame at any rate. Only the exposure shrinks. At 60 fps the Pi was at its limit (58 fps delivered, a few drops), and latency got slightly worse. Once the sensor reads out fast, pick the frame rate for smoothness and load, not latency. We settled on 720p30.
The ground-station app has its own buffer
Then we tried the app you actually fly with. QGroundControl played the stream with its default video settings (UDP H.264 on port 5600), with nothing to configure on the ground station. But by default it syncs frames to a clock and buffers them for smoothness.
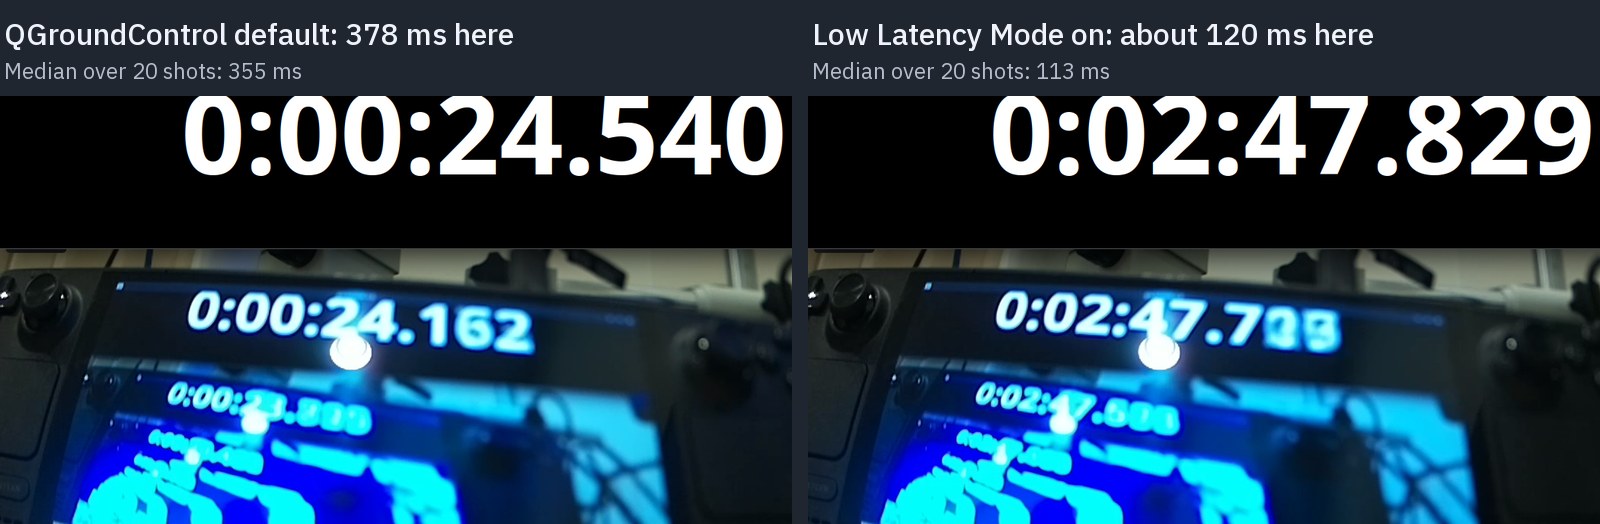
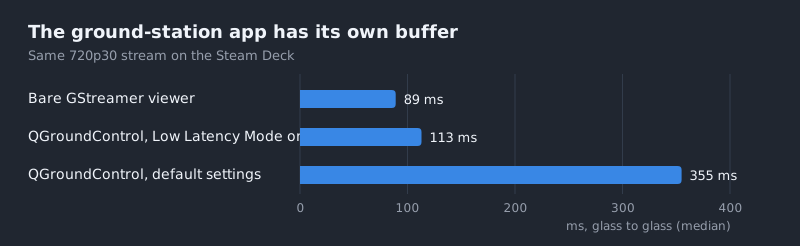
Turn on Low Latency Mode (Application Settings → Video). It took QGroundControl from 355 ms to 113 ms, only 24 ms more than a bare viewer. Whatever viewer you use, measure glass to glass in the app you fly with.
A checklist for your own camera link
- List the sensor modes and work out
width × height × fpsagainst the host ISP’s throughput. A binned mode is often the answer. - Check the delivered frame rate, with even frame spacing (
rpicam-vid --save-pts), before measuring latency. A stage that can’t keep up makes latency worse, not just the frame rate. - Use the fastest sensor link (CSI lane rate) the driver offers.
- Keep encoded frames whole from the encoder to the RTP payloader. No byte-stream pipes.
- On the ground station, use a decoder that doesn’t hold frames. Check it with GStreamer’s latency tracer.
- Don’t run the host at its limit. Above about 30 fps, extra frames buy smoothness, not latency.
- Measure glass to glass with 20 samples and take the median, in the ground-station app itself. In QGroundControl, turn on Low Latency Mode.
Further reading
- Raspberry Pi camera software documentation (rpicam-apps and libcamera)
- Picamera2 library
- GStreamer latency tracer
- QGroundControl video settings
- Our earlier post on flight controllers and companion computers, which covers why the video runs on the companion computer